Local Lumber Skateboards
We are making skateboards from local San Diego urban lumber. Here's a little blog post about how we did it. If you prefer to watch the video about this process, check it out here:

Most skateboards are made from 7 layers of hard maple veneer. Hard maple (also called sugar maple or rock maple - "Acer saccharum" is the scientific name) is basically the "standard" material used for boards due to its mechanical properties and cost. There are definitely boards made with other materials, though, very often, those boards often still contain maple as one of several materials.
One issue with maple is that it's grown mainly in one region of the world - northeast North America. Shipping this lumber around is not cheap and takes energy. Ever since I started making boards, I wondered why there weren't many boards made from alternative, locally-available lumber. Surely maple wasn't the only wood we could use for boards, right? I've seen many vertically-laminated boards made from other species of wood, but very few that were horizontally-laminated, like a traditional skateboard.

Natural distribution map for Acer saccharum.
Elbert L. Little, Jr., USGS, Public domain, via Wikimedia Commons
In the summer of 2021, I reached out to Lumbercycle, a local nonprofit in San Diego whose mission is to divert woody biomass from landfills by milling fallen trees into lumber and reinvesting it back into the local community. Their vision is to create zero waste utilization of trees. I asked if they'd be able to supply veneer and/or lumber that could be processed into veneer. I received an enthusiastic yes.
I was invited to their mill/lumber yard to choose a log. They happened to have a fresh log of red gum eucalyptus that we all thought would make a great experimental board. While eucalyptus is prevalent throughout San Diego, it is not actually a native species (you can read a brief history of eucalyptus trees in San Diego at the San Diego Floral Association's website: http://www.sdfloral.org/growinggrounds-6.htm). It happens to be a fast-growing tree, which is an appealing quality when considering the sustainability of a material. It is also a tough wood - according to "The Wood Database" website, here's how red gum and hard maple compare:
| Hard Maple | Red Gum Eucalyptus | |
| Specific Gravity (12% moisture content) | 0.71 | 0.87 |
| Elastic Modulus | 12.62 GPa | 11.8 GPa |
| Modulus of Rupture | 109 MPa | 123.8 MPa |
| Janka Hardness | 6,450 N | 9,600 N |
Source: Meier, E. (2008-2022). The Wood Database. https://www.wood-database.com/
Now, since wood is a natural, diverse material that can vary quite a bit, I assume there will be some variation in these values. However, these values are still useful for providing an estimate of what to expect. Here's a simplification of what these properties mean:
Specific gravity - the higher this number, the heavier the wood is. Red gum is typically heavier than maple.
Elastic modulus - how flexible/stiff the wood is. The lower this number, the more flexible the wood is (the more "give" it has). Red gum is typically more flexible.
Modulus of rupture - how strong the wood is. The greater this number, the stronger the wood is; in other words, the more force it can bear before it breaks. Red gum is typically stronger than maple. (Even though it is more likely to bend more than maple under a specific load, it can take a greater load before it breaks).
Janka hardness - the higher this number, the harder the wood is; meaning, it takes more force to make an indentation in the wood. Red gum is typically harder than maple.
A review of these properties led me to believe that red gum would make a very viable skateboard material. My main concerns were that the board would be too heavy and/or to flexible, and only making a board would provide answers.
In order to turn the log into veneer, we decided to cut the log into thin sheets, around 1/8" thick. Skateboard veneer is commonly between 1/16 and 1/24" thick, and I thought it would be best to use an alternative veneer the same thickness (I typically use all 1/16" veneer in my boards).
The method of cutting we used was quite different than how skateboard veneer is typically made. Typically, logs are put on a rotary cutter and veneer is "peeled" off, like you are unraveling a paper towel roll. In our case, we simply cut straight through the log. There was some variation in the cut thickness, but as long as the veneer was thicker than our final target of 1/16", we were good.

Milling the log.
I took the sheets of red gum to the workshop to dry out. I thought the sheets would dry out relatively quickly, following some online tutorials for drying wet veneer by stacking the sheets with paper towels and changing out the towels. This proved to be tedious and very slow, so I began to experiment with other methods of drying the wood. I needed to dry the wood so that, when pressed into a board, we wouldn't need to dry out the pressed skateboard and risk warping and cracking as the wood changed size as it lost moisture. Dryer wood is lighter and more responsive (stiffer/harder) than wet wood. Typically, maple veneer is around 6-10% moisture content when it is "dry" for skateboard laminating. Like with veneer thickness, I decided to seek the same values for the red gum.
Realizing that the veneers were beginning to warp as they were drying out. I thought it would be best to sand them down to their final thickness before they warped too much and wouldn't sand evenly in a drum sander.
A drum sander is a type of sander that allows you to sand down a piece of wood parallel to its opposite side. It's similar to a planer, but removes less material and leaves a smooth surface. After trimming the long sheets into shorter sheets (around 35" long), I ran the red gum sheets through the drum sander (with 80 grit sandpaper) until they were 1/16" thick. I needed to make several passes with each sheet, and the red gum would "gum up" the sandpaper, so this process took quite some time. After lots of sanding, I finally had some veneers. However, I still needed to make the crossband veneers.

Crossband veneers have their wood grain running perpendicular to their length to provide stiffness from side to side (and torsional stiffness) in skateboards.

In order to make these, I simply stitched together several smaller pieces of the veneers I had sanded by gluing the edges together. This is a tricky operation, given the small surface area of the faces being joined, but it actually does work (just be gentle!) Ultimately, veneers aren't providing any useful strength in the direction parallel with the grain, so the seam doesn't need to be strong.
To finish out the drying process, I found that the best method for me was to stack individual veneers between several sticks of wood to allow air flow, and keep weight on top of the entire stack to reduce warping. Even with sticks every few inches, the veneer still warped. And, the eucalyptus was so strong that the vacuum-bagging method I typically use to make boards didn't provide enough force to flatten the warps. So, I was going to need to use my hydraulic press and wood molds to make this board. (Pressing with the wood molds would be super satisfying, actually, as the wood molds were made in-house and they were design using SK8CAD - the open source, DIY skateboard design software provided by Open Source Skateboards; this board was going to be super DIY!)

Red gum veneers in press. Two sets of maple veneers were added on top, as these molds are designed to press 3 boards at a time.
While this method of cutting the wood into thin sheets and drying out the veneers individually works relatively fast, it may be better to kiln-dry bigger logs and then resaw the dried lumber so that you don't have to worry about the warping issue.

The rest of the build process proceeded exactly as a maple board build. I chose to shape the board by hand to get a feel of the material, rather than using a CNC router to shape it. To my surprise, the red gum actually seemed to be easier to cut and shape than maple is. I cut the board into the shape I wanted to ride - an 8.5" width, 14" wheelbase, symmetrical twin-tip popsicle. The board looked beautiful.
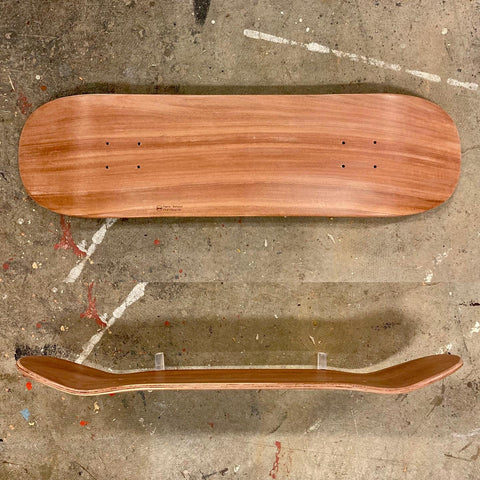
Finally, the time came to skate this board. I didn't know what to expect. Thankfully, we documented my first steps on the board. The board felt amazing. It was noticeably heavier (by almost 1.5 lb), yet I felt like pop hadn't been compromised. I also didn't feel that the board was any more flexible than my maple boards. My first session on the board was October 2, 2021. As of mid-February 2022, I'm still riding this board. I've been putting it through some abuse, and it has held up great. The best part of all was knowing that this was made from locally-grown wood that would have otherwise ended up in a landfill if not for Lumbercycle.
Going forward, I'll be offering limited edition runs of local lumber boards. Each of these local lumber board sales will include a donation to Lumbercycle, the organization making this all possible.
Thank you for taking the time to learn about this process and allowing me to share my experience with you.
Happy skating and happy creating!
Peace,
Beau
